...look at me go! COPIC markers still snuggled nice and comfy in their little Angel Hello Kitty case feeling a little bit left out. Sorry COPICs, that's the way the ball crumbles and the cookie bounces!
I am having so much fun trying different ways to stamp - some of the experiments I tried didn't work, almost kind of worked or turned out okay, but it's getting me to pull eeeeverything out and trying new things! Never distress embossed before? Never used acrylic paint daubers on a project before? Never distress inked anything before? Who cares! Bust them out and fake it 'til you make it! That's the fun part about distressing - even if it's kind of messy or imperfect, nobody else needs to know that, just tell everyone it's "distressed!" What? It's not ripped, it's distressed! What? It's not splotchy, it's distressed! Have fun, get inky, get meeessy! *gasp* I know...You know when your craft table is messy? When you set something aside so that it doesn't get inked on and five minutes later, you can't find the thing you set aside. So you make another one because after searching frantically, you still can't find it and then when you go and set something else aside, you find the other thing that you couldn't find before. HAHAHAHA...I don't know who that happens to................
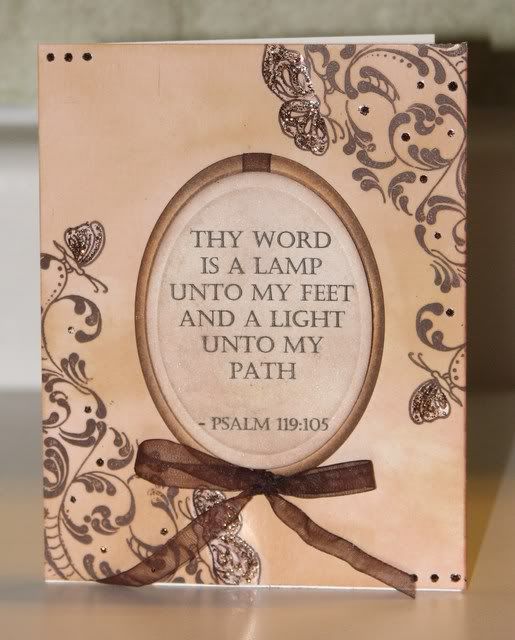
Aaanyways, after a few misplacements, I finally was able to get it together but I did have a bit of trouble today. Work sucked the rest of the mojo out of me and left me with not much else to work with today! Here is my completed project: Starting off with a piece of glossy cardstock and my oh-so-useful, oh-so-trusted foam ink applicator, I used a couple colours of Distress Ink (Tea Dye, Vintage Photo) and inked up the entire surface going around in circles with my foam ink applicator. Next, I turned to my rich and creamy Versamark Dew Drop in Jumbo Java and inked up my Butterflies a-Flutter stamp and hit up each corner with a nice thick coat. When the ink dried (with the help of my heat gun) I rubbed my finger around over it to give it a more "distressed" look (or did I just not stamp it right? Who knows, that's the beauty of distressed! *LOL*) Okay, I lost track of what I was talking about...HAHAHAHA! Oh right, using my ONLY Nestability set, I cut out my verse. I was going to go a different way, but since today is the first day of Lent, I thought I would go the biblical path. I also cut out a larger oval to mat my verse. For the verse, I misted it over with Perfect Pearl mist (left over from yesterday, no sense in that yummy, shimmery mist to go to waste, right?!), dried and then inked over with the Versamark ink. The ribbon was a sheer PURPLE when I pulled it out of my ribbon drawer, but with a couple swipes of my little Dew Drop, voila! Now it matches everything else! Took a little bit of Cinnamon Stickles because I haven't bonded with them in a while and Stickled certain areas! That's it for me for now, please come back later on for a little bit more SillySkittle-isms! I've got my last installment of pictures for the giveaways - it's THIS WEEKEND! Please come by on Sunday and visit for a chance to win my blogaversary THANK YOU prize! Thank you for stopping by! MATERIALS Stamp: Butterflies a-Swirl by Pez-a-Doodle Designs
Hey, do you know that movie that came out a while back called Inkheart? This post has nothing to do with it, except for the word ink. *LOL* What DIDN'T I ink in this project?!
All hyperlinked products and materials are from Pez-a-Doodle Designs
Ink: Versamark Drew Drop in Jumbo Java, Distress Inks in Tea Dye, Tattered Rose and Vintage Photo
Paper: Glossy Cardstock (NOT the same as photo paper!)
Embellishments: Stickles, Ribbon
Tools: Oval Nestabilities, Foam Ink Applicator
CURRENT MOOD: LAZY CURRENTLY LISTENING TO: SUNGLASSES


3 comments:
WOW !! This is a beautiful card! Simply beautiful!!
Love how you're using your stamps this week!
beautiful, we sing this at my church
Post a Comment